The initial step to harness the power of the Biziq API involves creating the API service tailored to your preferred module. The following example demonstrates the creation of the Invoicing API; however, the process is analogous for other modules.
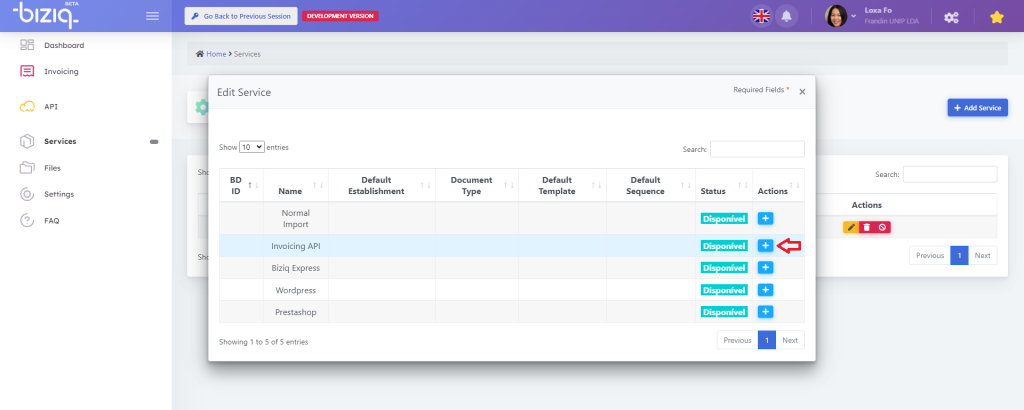
Access the Biziq platform and proceed to the “Services” tab. Locate and edit the service to which you want to add the API. In this case, Invoicing.

Within the “Edit Service” modal, choose “Invoicing API” as the designated service.
- In the “Create Service” modal, edit the information to align with your specific requirements.
Note: If you wish to use more than one document type, for example Invoices and Simplified Invoices, you need to create more than one service.


In this section, we’ll guide you through the essential steps to secure and authenticate your interactions with the Biziq API. Authentication is a critical aspect of the API ecosystem, ensuring that only authorized users can access sensitive data and perform designated actions.
In this chapter, you will learn how to obtain the necessary credentials, understand the authentication mechanisms, and implement secure practices to safeguard your data. Whether you’re a seasoned developer or just getting started, mastering authentication is key to harnessing the full potential of the Biziq API.
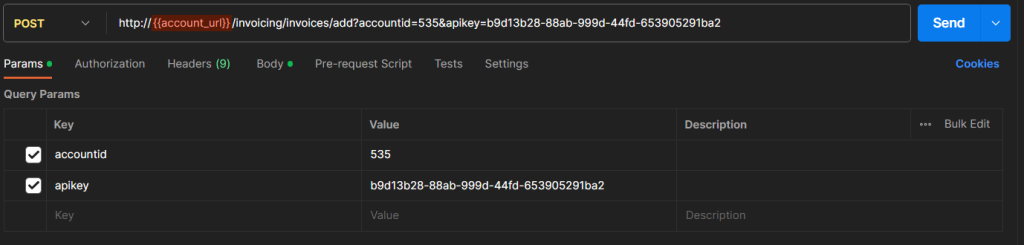
To access, or update, your data through the API, authentication is imperative. All API requests must include the following headers to ensure secure and authorized interactions:
accountid: A single value used to uniquely identify the user – this value can be subject to change.;
apikey: A unique key essential for API usage;
company_vat: The company taxpayer number (necessary if your account is associated with more than one company).
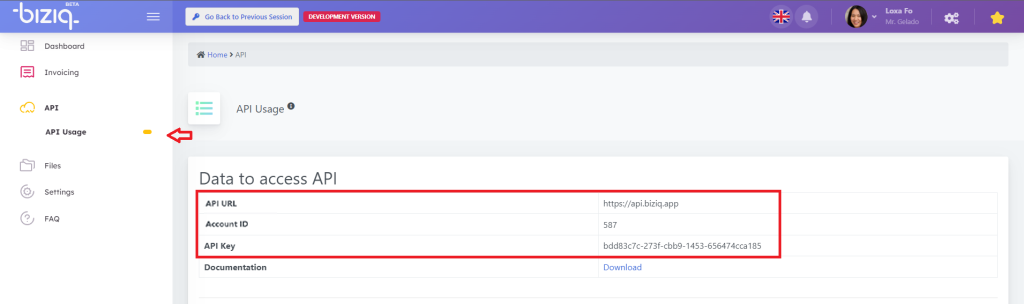
These authentication details can be retrieved from the dashboard API page, providing the necessary credentials to authenticate your requests and maintain the security and integrity of your data.
All the examples provided in this documentation were crafted using the Postman software, a versatile tool for testing and exploring APIs. Postman simplifies the process of sending HTTP requests, examining responses, and ensuring the seamless integration of the Biziq API into your applications.
Install Postman: Ensure that you have Postman installed on your development machine. If not, you can download and install it from Postman’s official website
Create Requests in Postman: Manually create requests in Postman based on the API endpoints and operations outlined in the documentation.
Replace Placeholder Values: Replace any placeholder values such as
accounturl*,accountid,apikey, and/orcompany_vatwith your actual authentication details.
(*) – The account url value used on this example depends on the type of account you are using, can be found under the value API URL on the API Information page, for example:
https://api.biziq.app
https://sandboxapi.biziq.app- Run Requests: Execute the requests within Postman to observe how the API responds. Examine the request parameters, headers, and response data to understand the API’s behavior.
In some API requests, it is essential to include additional details that identify the specific information you wish to access, or update, within the system. This additional information is transmitted in JSON format.
To send data in JSON format using Postman, follow these steps:
- Navigate to the request body field.
- Opt for the “raw” option.
- Modify the text format to JSON, ensuring accurate representation of the data you intend to transmit.
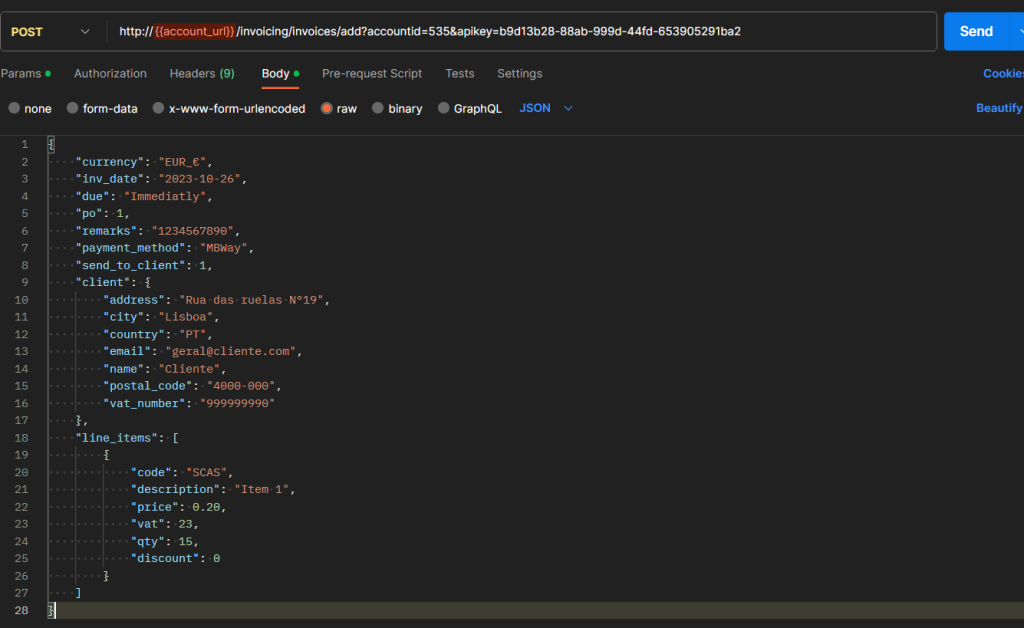
This methodology ensures that your API requests carry the necessary information in a structured JSON format, facilitating seamless communication with the Biziq system.
|
Error message |
Description |
Solution |
|
Authentication Failed! |
It is missing the authentication data or data is wrong. |
Select the correct apikey, accountid and company_vat and type in the params table at Postman software. The data is found at the API usage menu. |
|
The company_vat is required because you have more than one company in your account! |
Select the correct company_vat. |
You have more than one company in your account, you should indicate the company_vat. |
|
There is no Invoicing API service set for this Type of Document, please set or active one! |
No Invoicing API service avaiable for the selected document. |
Create an API service by editing the services at the dashboard menu All Services at Services module. If it is already created it just needs to activate at the dashboard. |
|
Something is wrong with the Brand of the API Service for this Document Type!, Please update your API Service for this Document Type! |
The microservice can not find the brand. |
Check if the brand exists in the Brands/Taxes menu at the Settings module. |
|
The Brand of the API Service for this Document Type has no Fees/Taxes! |
There are no taxes or fees associated with the brand. |
Check the values at the Brands/Taxes and Fees menu in the Settings module. |
|
The vat of the item with the code “$line_code” is invalid! |
Wrong format VAT value. |
Insert the brand VAT value in numeric format. Ex: 23 |
|
The tax exemption is required! |
Tax exemption is mandatory. |
Select the tax exemption code. You can get in this document at table 2. Ex. M01 |
|
The client.vat_number is invalid for the inserted client.country |
VAT number is not valid in the selected country. |
Select the correct ISO 3166 country code and VAT number. Ex: “PT”, 912345678 |
|
The client.postal_code is invalid for the inserted client.country! |
Postal code is not valid in the selected country. |
Select the correct ISO 3166 country code and the postal code. Ex: “PT”, 1234-123 |
|
The client.vat_number invalid due to the Document value! Cannot use the vat_number of ‘999999999’ when the Document value is more than 1000! |
It is mandatory in Portugal to add the VAT number to the invoice if the amount is bigger than 1000€. |
Add VAT number to invoice creation. |
|
The inv date is invalid! |
Not valid invoice date. |
Insert the invoice date in the correct format. ‘Y-m-d’, ‘Y-m-d H:i’ e ‘Y-m-d H:i:s’. Ex: 29/03/2023 00:00 |
|
Name is invalid |
Not valid invoice name. |
Select the invoice name in the correct format. Ex: “FR BETA/000075” |
|
No Invoicing API service set for this account service, please set or activate one! |
There is no invoicing API service to this account service. |
To activate the service, select the green check mark at All Services menu dashboard at Service module. To add a service select the Add Service button. |
|
The sequence of the API Service for this Document Type is not active! Please activate Sequence or Update the API Service for this Document Type! |
There is no sequence to this document type. |
To add or activate a sequence must be done at menu All Services dashboard in Services module. |
|
Sender is required! |
Sender is mandatory. |
Select a Sender that can be found at Sender menu at SMS module. Ex: “Test Sender” |
|
Mobile_num_blk not valid it should be comma separated 9 digit number |
Contacting numbers formatting error. |
Contact numbers should be compound by nine digits and separated by commas. Ex: “912345678,912828788”. |
|
mobile_num not found |
Mobile number not registered in the software. |
You can add the mobile number at the option Add Contact in menu Contacts within SMS module. |
|
template_name not found |
Template number not registered in the software. |
You can add the sms template at the option Add Template in menu Templates SMS module. |
|
Invalid format, Please Enter Correct Date Format (dd/mm/yyyy H:M) |
Date formatting error. |
Insert the date in the correct format (dd/mm/yyyy H:M). Ex: 29/03/2023 00:00 |
|
Invalid format, Please Enter Time (dd/mm/yyyy H:M) |
Time formatting error. |
Insert the time in the correct format (dd/mm/yyyy H:M). Ex: 29/03/2023 00:00 |